Summary
Setting up an Ethernet network can feel like assembling a puzzle, and to get all the pieces in place, you need to configure each system to operate on the same IP network. This ensures that each participant has a unique IP address and can find his fellow network buddies.
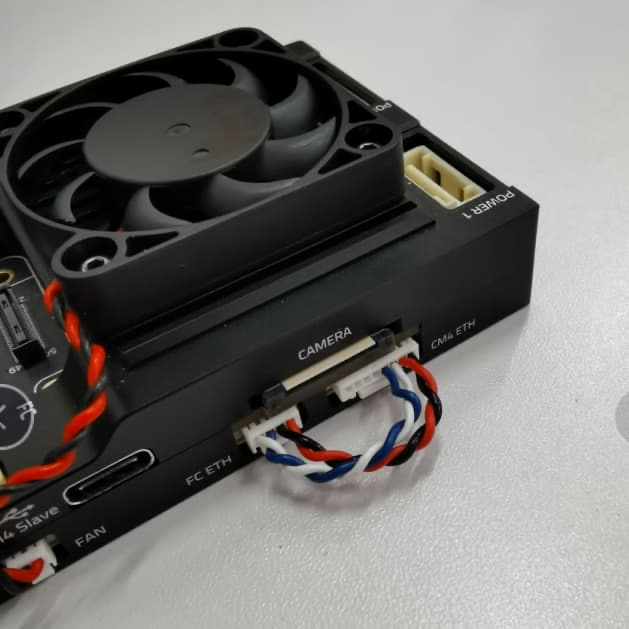
For today’s tutorial, I will enlist the help of my trusty companion, the Pixhawk 6X + Raspberry Pi CM4 baseboard that my friends from Holybro kindly sent for testing, but you can be sure the following tutorial will work with any Pixhawk connected to a CM4.
You can either rely on a DHCP server to hand out addresses like party invitations or take matters into your own hands by manually configuring the addresses for each system on the network.
We know we know—there isn’t a magical “plug-and-play configuration” that we can conjure up to guarantee compatibility with your local network. So, instead, we’re going to share a tantalizing example of the type of configuration you might whip up. Picture this: we set up the systems on an IP network with static addresses in the mysterious 192.168.0.XXX range. Our valiant Holybro Pixhawk 6X takes up the mantle of 192.168.0.4 while the computer bravely claims the address of 192.168.0.1. Want to invite a companion computer or another system to this networking party? Simply use a similar method to allocate a static address.
A quick note: while the network configuration might not be as “special” as Grandma’s secret cookie recipe (except maybe for the tools used to tweak the network settings), it does operate similarly to any residential or commercial network. In other words, it’s a good idea to brush up on your IP networking skills—after all, knowledge is power (and it might just save the day at your next networking soirée)!
Pixhawk Networking with PX4
Now that we’ve built the foundation for our Ethernet networking party, it’s time to introduce the maestro of the show, PX4’s netman module, which orchestrates network settings like a seasoned conductor.
The secret recipe for network settings is hidden in the configuration file /fs/microsd/net.cfg on the SD card. This text file unveils each setting as a name=value pair on a new line, not unlike a treasure map. A typical configuration file might resemble:
DEVICE=eth0
BOOTPROTO=static
IPADDR=192.168.0.4
NETMASK=255.255.255.0
ROUTER=192.168.0.254 DNS=192.168.0.254
These cryptic values represent:
- DEVICE: Interface name. The default is the ever-popular eth0.
- BOOTPROTO: The protocol for securing PX4’s IP address. Valid options include DHCP, static, and fallback (a daring combination of DHCP with a static address backup plan).
- IPADDR: The static IP address (called into action if BOOTPROTO is static or fallback).
- NETMASK: The network mask, keeping things organized.
- ROUTER: The address of the default route, guiding us through the networking jungle.
- DNS: The address of the DNS server, solving the mysteries of domain names.
In order to play with netman, you can take advantage of the MAVLink console that can be accessed through QGroundControl:
Connect the flight controller to the computer with a USB cable as if you were linking two long-lost friends.
Open QGroundControl > Analyze Tools > MAVLink Console, the secret doorway to networking bliss( FC port has to be used for this case). You also can use the MAVLINK shell in this case. It’s good practice to double-check your current config before updating by using the command netman show, which gives an output like the below:
nsh> netman show
DEVICE=eth0
BOOTPROTO=static
NETMASK=255.255.255.0
IPADDR=192.168.0.3
ROUTER=192.168.0.254
DNS=192.168.0.254
If you are happy with the settings, skip the next steps.
The recommended way to update the configuration is to write directly to the file, as shown in this example by entering the “spell-like” commands into the MAVLink Console to save the values in the configuration file:
nsh> echo DEVICE=eth0 > /fs/microsd/net.cfg
nsh> echo BOOTPROTO=static >> /fs/microsd/net.cfg
nsh> echo IPADDR=192.168.0.4 >> /fs/microsd/net.cfg
nsh> echo NETMASK=255.255.255.0 >>/fs/microsd/net.cfg
nsh> echo ROUTER=192.168.0.254 >>/fs/microsd/net.cfg
nsh> echo DNS=192.168.0.254 >>/fs/microsd/net.cfg
To update the network settings you can enter the command below:
nsh> netman update -i eth0
The system will reboot using the updated network settings.
Once the network configuration has been set, you can bid farewell to the USB cable connection.
Publishing MAVLink over Ethernet
Keep in mind that this setup grants the flight controller an esteemed place at the Ethernet networking table. But we’re not done yet—oh no! You still need to configure the Ethernet port to embrace MAVLink (or XRCE-DDS which will be covered in a future blog post) with open arms which comes after:
The Ethernet port configuration sets the properties of the serial link (which is how PX4 views the Ethernet connection). This includes the set of streamed MAVLink messages, the data rate, the UDP ports that a remote system can connect to, etc.
PX4 is able to publish telemetry data through a few pre-defined ports on Pixhawk, typically used to connect to a ground control station or any other MAVLink-consuming component. You can configure this functionality using the parameters shown below:
| Parameter | Value | Description |
| MAV_2_CONFIG | 1000 | Configure Ethernet port |
| MAV_2_BROADCAST | 1 | Broadcast HEARTBEAT messages |
| MAV_2_MODE | 0 | Send the “normal” set of MAVLink messages (i.e., the GCS set) |
| MAV_2_RADIO_CTL | 0 | Disable software throttling of MAVLink traffic |
| MAV_2_RATE | 100000 | Maximum sending rate |
| MAV_2_REMOTE_PRT | 14550 | MAVLink Remote Port of 14550 (GCS) |
| MAV_2_UDP_PRT | 14550 | MAVLink Network Port of 14550 (GCS) |
Normally, a companion computer would use port 14540 (rather than 14550) and stream the set of MAVLink messages specified in the Onboard profile. You can configure this setup by changing MAV_2_REMOTE_PRT and MAV_2_UDP_PRT to 14540 and MAV_2_MODE to 2 (Onboard). Note however that this will still work using the GCS profile.
For more information on MAVLink serial port configuration see MAVLink Peripherals (GCS/OSD/Companion)
And now, for the grand finale of our networking extravaganza! With the Holybro Pixhawk 6X configured and ready to mingle, it’s time to connect it to your local network and put it to the test.
First, ensure that your Pixhawk 6X is properly connected to the local network using an Ethernet cable. It’s like plugging in the final piece of a high-tech jigsaw puzzle.
Next, fire up QGroundControl on a computer that’s also connected to the same network. This is where the sparks will fly.
If QGroundControl is in the same network and the flight controller is able to broadcast over the network QGC will automatically connect to the flight controller; in the rare case that this doesn’t happen, you can still manually set up a connection by navigating to the “Connect” panel, and select the “Add” button. It’s like sending an exclusive invitation to your Pixhawk 6X.
Choose the “UDP” option and enter the static IP address you assigned to your Pixhawk 6X (in our example, it’s the ever-dashing 192.168.0.4). Don’t forget to specify the appropriate port number, too.
Click “Connect” and behold as QGroundControl and your Pixhawk 6X establish a harmonious bond. If everything goes according to plan, you’ll be able to see the telemetry data streaming in and even send commands to your Pixhawk 6X.
And there you have it! With a sprinkle of networking know-how and the generous help of QGroundControl, your Holybro Pixhawk 6X is now successfully connected to your local network.
Subscribing to data using the Raspberry Pi CM4
Introducing the Dynamic Duo: CM4 and Pixhawk
Pairing a companion computer with a flight controller? Now that’s an idea worth considering. Think about it: your drone gets a cool upgrade with image processing, nifty obstacle avoidance skills, and even a dash of machine learning. Pretty neat, isn’t it? Given all these perks, it might be the smart move you want.
Setting up a physical network
In order to establish a glorious Ethernet connection between the CM4 and the flight computer, these two networking partners must be physically linked together using an 8-pin to a 4-pin connector. It’s like joining two soulmates with a digital handshake.
With this enchanting cable connection, you’re one step closer to achieving an Ethernet connection between the Pixhawk 6X and the Raspberry Pi CM4.
Network setup on CM4
Since no DHCP server is active in this configuration, the IPs must be set manually: First, connect to the CM4 via ssh by connecting to the CM4’s wifi (or use a Wifi dongle). Once the ethernet cables are plugged in, the eth0 network interface seems to switch from DOWN to UP.
You can check the status using:
ip address show eth0
You can also try to enable it manually:
sudo ip link set dev eth 0 up
It then seems to automatically set a link-local address; for me, it looks like this:
 ip address show eth0

2: eth0: <BROADCAST,MULTICAST,UP,LOWER_UP> mtu 1500 qdisc mq state UP group default qlen 1000
link/ether xx:xx:xx:xx:xx:xx brd ff:ff:ff:ff:ff:ff
inet 192.168.0.3/24 brd 192.168.255.255 scope global noprefixroute eth0
valid_lft forever preferred_lft forever
inet6 fe80::yyyy:yyyy:yyyy:yyyy/64 scope link
valid_lft forever preferred_lft forever
This means the CM4’s ethernet IP is 192.168.0.3, in your case, the IP will likely be something else.
Networking Test: Let’s get talking
Let’s perform a simple ping test to make sure both the CM4 and Pixhawk 6x can talk over the network; from the Linux terminal on the CM4:
ping 192.168.0.4
PING 192.168.0.4 (192.168.0.4) 56(84) bytes of data.
64 bytes from 192.168.0.4: icmp_seq=1 ttl=64 time=0.188 ms
64 bytes from 192.168.0.4: icmp_seq=2 ttl=64 time=0.131 ms
64 bytes from 192.168.0.4: icmp_seq=3 ttl=64 time=0.190 ms
64 bytes from 192.168.0.4: icmp_seq=4 ttl=64 time=0.112 ms
--- 192.168.0.4 ping statistics ---
4 packets transmitted, 4 received, 0% packet loss, time 77ms
rtt min/avg/max/mdev = 0.112/0.155/0.190/0.034 ms
And from the Pixhawk using the MAVLink Console in QGC:
nsh> ping 192.168.0.3
PING 192.168.0.3 56 bytes of data
56 bytes from 192.168.0.3: icmp_seq=0 time=0 ms
56 bytes from 192.168.0.3: icmp_seq=1 time=0 ms
56 bytes from 192.168.0.3: icmp_seq=2 time=0 ms
56 bytes from 192.168.0.3: icmp_seq=3 time=0 ms
56 bytes from 192.168.0.3: icmp_seq=4 time=0 ms
10 packets transmitted, 10 received, 0% packet loss, time 10 ms
Publishing MAVLink over the network
For this, we need to set the mavlink instance to send traffic to the CM4’s IP:
For an initial test, we can try publishing to the IP of the CM4:
nsh> mavlink start -o 14540 -t 192.168.0.4
This will send MAVLink traffic on UDP to port 14540 (the MAVSDK/MAVROS port) to the 192.168.0.4 network address which means it is receiving data and any process can just listen to UDP data arriving at that default port.
Writing a Python script using MAVSDK over the network
With our setup finally complete, we can begin developing on the CM4, consuming MAVLink telemetry over the network. The best way to programmatically work with MAVLink for simple scripts is to use the MAVSDK-Python library. In this example, we will use the “tune” example from the project which plays sound tones directly on the Pixhawk hardware.
For instructions on how to get started with MAVSDK-Python, you should check the official docs, where you can find detailed information on installing, setting up, and working with the library. To run a MAVSDK-Python example and try out an example from MAVSDK-Python/examples.
python3 -m pip install mavsdk
wget https://raw.githubusercontent.com/mavlink/MAVSDK-Python/main/examples/tune.py
chmod +x tune.py
./tune.py
Thanks for reading
If you liked this tutorial, please consider sharing it with your colleagues; we appreciate your time and look forward to seeing you on our blog again soon.