Intro
So it looks like you have stumbled upon the PX4 Deep-Dive series.
This is a regular series that will be published on the PX4 Blog. We hope to explain exciting and complex PX4 concepts simply and clearly – giving you a broad understanding of how PX4 works.
In our first blog post, we will be discussing PX4 Parameters; if you are a PX4 user, you probably have seen that giant list in QGC when you glance through the Parameters tab, with all the weird names like “EKF2_ABIAS_INIT”.
This blog post is mainly intended for PX4 users who don’t know what parameters are, would like a guided tour, or like me, find them confusing. I will explain why, how, and where Parameters are used and give you hands-on examples of how to use/configure them.
I have split this guide into two blog posts, the first covering a parameter’s essential details and structure and the second covering their internal workings.
If you are a developer who already has a lot of experience with parameters, you may find the second blog post published soon of interest. It covers the internal working of the parameter storage system.
Let’s get started!
What is a Parameter?
I asked a long time PX4 contributor and Developer Team member Matthias Grob this question, and the response was:
“A configuration option that you can change within the running system, without having to recompile it.”
Matthias Grob
This is a pretty nice explanation, but it won’t sound intuitive if you aren’t familiar with computer science terminology. However, it does capture the essence of parameters, so let’s start with the basics of why we need a parameter in layman’s terms.
Why do we need parameters?

Let’s imagine you are controlling a giant street cleaning robot programmed to move at a maximum speed of 5 km/h. That’s fine on a typical day when you have to stop at every trashcan on the street, but you’d find it very frustrating to have it move so slowly when it moves across the city to start working on a new road.
The first solution to this problem is to bring the robot back to the workshop, change the maximum speed, and reinstall the software. A bit of a hassle!
The second solution is using a parameter system.
What if you had a way to change the robot’s maximum speed on the fly, without needing to take it back to the shop? Not just 5 km/h but upwards to 40 km/h and more. In this case, all you need to do is connect to the robot and update the parameter value. Boom -the speed problem is solved.
Similarly, what if we had a parameter that could temporarily disable trash cans’ detection? Then you could use that same robot for an inspection cruise around the city.
Obviously, PX4 isn’t widely used in cleaning robots (yet ;0), but this example shows the importance of a configuration. In PX4, this flexible configuration is achieved via parameters.
Here is another example: What if you wanted to make a flying robot that cleans the streets? It would need to use completely different logic to control the movement than a ground vehicle, right? Even more significant configuration changes like these can be done in PX4 with parameters. For example, one particular parameter is used to define the vehicle type!
Now let’s move on to actual examples of parameters in PX4!
What do parameters look like?

Matthias’ answer above is spot-on: the concept of parameters is used for configuring and modifying behavior on the PX4 Autopilot.
I hope the cleaning robot example gave you a more intuitive understanding on parameters.
Below are a few examples of actual parameters you can find in PX4. I think it’s a good idea to break them down before we jump into more complex concepts, so you can get familiar with them:
- BAT1_N_CELLS
- MPC_XY_VEL_MAX
- RC_MAP_ARM_SW
These naming may appear cryptic; however, they follow a naming convention. Once you get familiar with the rules, navigating and understanding parameters becomes easier.
BAT1_N_CELLS
The acronym stands for BATTERY _ NUMBER _ CELLS
This parameter defines the number of cells inside Battery 1. PX4 supports multiple batteries, so this is the setting for the primary battery.
The number of cells is a unit used for categorizing the voltage of the Lithium-ion and Lithium-Polymer batteries. This Parameter can have values between 1 and 16, indicating the number of cells in the battery. The higher the number of cells, higher the total battery voltage.
MPC_XY_VEL_MAX
Or spelled out: MULTICOPTER_POSITION_CONTROLLER _ XY _ VELOCITY _ MAX
MPC is an acronym for ‘Multicopter Position Controller,’ a category of settings for controlling the position of all kinds of copters (helicopter, quadcopter, etc.). Any parameter with an MPC_ prefix is related to a Multicopter’s Position Controller logic configuration. An excellent tip for you to understand parameters better 😉
Link to multicopter position control diagram
VEL means ‘Velocity.’ And XY means it’s related to the X and Y-axis component only, which corresponds to the horizontal plane.
Link to flight control orientation guide
So this parameter stands for the maximum horizontal speed limit for the MPC. This means that the value you set this parameter to will be the maximum horizontal velocity of the multicopter during auto flight mode maneuvers.
Link to the guide on PX4 flight modes
RC_MAP_ARM_SW
RADIO CONTROL _ MAP _ ARM _ SWITCH
RC stands for ‘Radio Controller,’ the transmitter with joysticks and buttons, similar to game controllers. The RC is used for controlling the drone.
To “arm” means enabling the motors. This is common terminology used in the drone community (e.g., Betaflight, Ardupilot, etc.) to indicate whether a drone can spin up the motors and start flying. So if the drone is armed, they are allowed to spin, and while disarmed, motors are prevented from rotating.
SW is short for “switch.” This parameter, which can have values from 0 to 18, indicates which RC channel is used for the arm switch. Every kind of command you can send, like throttle, pitch, roll, and yaw, is associated with a specific RC channel. So depending on your Radio Controller, you can have as few as 4 to as many as 18 channels!
Are you beginning to understand how the parameters are used and named? Exciting ideas and concepts, right? Hopefully, it will all start to make sense. Now let’s get onto some essential traits of PX4’s Parameter System.
Traits of parameters
We will discuss what type of data parameters can contain and what we expect from them.
Types
There are 2 types of parameters : Integers (e.g. 1, 2, 3 …) and Floats (Floating point number, e.g. 1.2, 4.5, -9.4 …).
Anything that can be represented in Integers (e.g., Battery1 cell count, Arming RC switch channel) is stored as Integers. And anything that requires decimal values (e.g., Multicopter Position Controller Maximum XY Velocity) is stored as Floating points.
You can check all the parameters used in PX4 in this Parameter Reference documentation part of the PX4 User Guide.
Pop Quiz! : How would you name the parameter for the “Cruise Airspeed of a Fixed Wing (Airplane), for example”? And which data type should it be stored in?
The answer is at the end of this section 😉
Storage
Parameters are stored in the persistent storage of the microcontroller, also known as MCU. PX4 reads from storage every time it starts up, retaining parameter values even when the processor powers off. Think about it, It would be annoying if the Parameters would reset to default when you reboot a vehicle.
You can think of the persistent storage as the ‘Hard disk’ of the flight controller.
Naming
Parameters use acronyms (such as MPC) because of a self-imposed limit on the length of the name of a Parameter, set to 16. If they did not, the names would be too long!
Reboot requirements after the change
Given how complex the architecture of a critical safety system in PX4 can be, a parameter change might end up affecting quite a few things, including other parameters. Some parameters require a reboot for their change in value to take effect. The reason behind this is to make sure system critical parameters are correctly applied throughout the system.
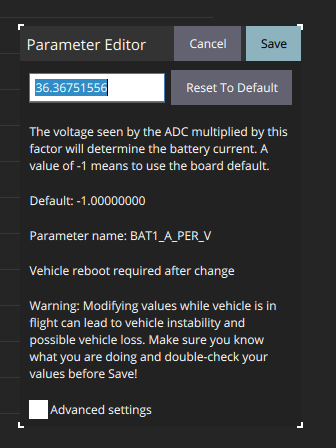
You can check this via the “Parameters” tab in QGroundControl. For example, changing a parameter such as the “BAT1_A_PER_V” (discussed above) requires a reboot.

Quick example
Let’s also try out the situation of a cleaning ground robot being reconfigured into a cleaning flying drone in action: change of vehicle type, the airframe.
Note : PX4 uses the term airframe for legacy reasons since it started as a flying drone project. But now it also supports rovers and boats and more!
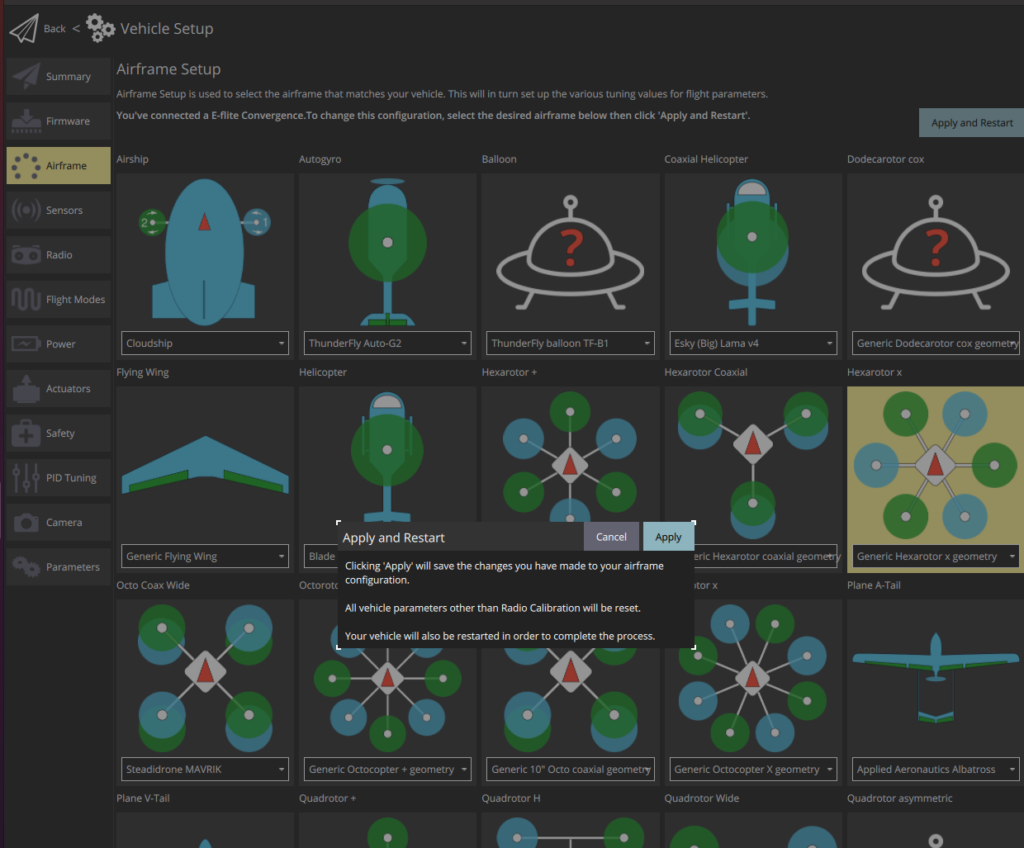
If I had my cleaning ground robot connected to QGC, I would need to change the “airframe type” from “Rover” to a “Multicopter.”

As mentioned before, even the airframe is defined via a parameter. In this case, the parameter is called SYS_AUTOSTART.
If I change the airframe to the ‘Hexarotor X’ type, QGC will warn the user the parameter change will reset all the vehicle parameters, requiring a reboot.
PX4 will automatically configure the parameters to match Hexarotor’s vehicle type when we reboot. For example, it will set the MPC_XY_VEL_MAX parameter because it’s a multicopter.
This is an interesting example of a system critical parameter change requiring a reboot.
Valid range and default values
Since it’s so easy to configure a parameter, it can be dangerous for you to set any value you want. For example, if you set the landing speed of the drone to 10 [m/s], it would most likely crash into the ground because it’s too fast!
For this reason, parameters each have their validity range and a default value to help prevent such mistakes and give a decent default value to start off in the beginning.

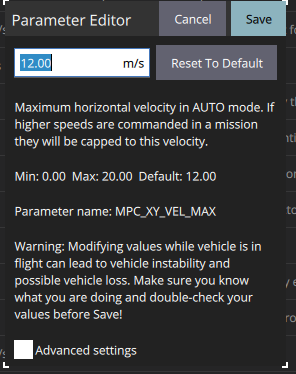
These safe ranges are hard-coded in the PX4 Source code. For example, the parameter MPC_XY_VEL_MAX that I mentioned before can only be set to values between 0.0 and 20.0 [m/s]. However, you can force a parameter out of range if you click on the additional warning checkbox in QGC.
For example, the 20 m/s limit for the maximum horizontal velocity is very arbitrary, but it makes sense since most multicopters won’t be flying above 20 m/s (72 km/h). If you mistakenly enter 100 [m/s] as the maximum horizontal velocity, QGC will warn you that this value is outside of the range that the parameter is intended to be used in and won’t apply the value
Also, the parameter’s default value is 12.0 [m/s], which is another hard-coded value. The “default value” is the value for each Parameter that will reset when you click ‘Reset to Default’ in the QGroundControl. In other words, this is a ‘base’ value that you can start off with when tuning your system, provided by PX4 Developers. In most cases, your drone will fly fine with the default values.
Parameter metadata in the source code
Where are these ranges and default values coming from?
First, we call these properties ‘metadata’ since they contain the Parameter properties. Metadata is directly defined in the source code, and it gets automatically updated & applied to QGC and the PX4 User Documentation every time it changes.
This is, in my opinion, one of the most unique/cool features of PX4.
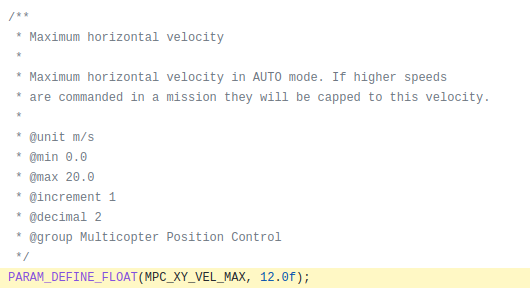
Let’s inspect how the MPC_XY_VEL_MAX Parameter is defined, as it provides a good example.

Link to implementation in source code
The comment above the PARAM_DEFINE_FLOAT is what we will focus on. It includes all the settings mentioned above with a special @ marker.
It defines the m/s as the unit displayed in QGC and helps other developers when working on the code. Next there are min/max values of 0.0 and 2.0. This is exactly the same information shown in QGC, in case you haven’t noticed already!. Then increment is 1, and decimal is up to 2nd digit, which is why you can set it to a value like: 12.43.
The meta-information can also define the @reboot_required flag to enforce a reboot after this Parameter was changed. This is the flag QGC uses to display users’ “Reboot Required” message. HOWEVER, the MPC_XY_VEL_MAX Parameter in this example doesn’t have this flag set.
Finally, the meta-information also defines which ‘group’ it belongs to. The group is the left column on the QGC Parameters page that conveniently groups together relevant parameters, like MPC’s XY velocity and Z velocity settings, for instance!
The magical process that allows transferring this source code comment to QGC and PX4 User Documentation is called “Metadata,” which you can read more about on the PX4 user guide here.
The answer for the pop quiz is: Since they can have non-integer values like 10.5, 2.43 [m/s], it’s defined as Float, and its parameter name is FW_AIRSPD_TRIM.
Did you get it right?
Hopefully, you got an overview of how the Parameter behaves by now!
How to use the Parameters
We are not covering how to use parameters in this blog post. There’s already an excellent guide on the PX4 User Documentation. We recommend you check that out.
Thanks for reading
Stay tuned for Part 2 which will be published soon! There we will take a deep dive into the actual source code level implementation of Parameters and the utilities available for developers.
Let us know how we did below.
Did this blog post explain the concept clearly? Did I miss anything important? Do you have suggestions on how to improve this blog post? Or have any suggested future topics? If so, please give us your valuable feedback in the form below. I’m eager to read your feedback and thoughts on this blog post.
See you in the next blog post!
-Junwoo
PS: You can find me on Dronecode Discord Server (click to get an invite)
