Welcome back to episode 2 of the PX4 deep dive series. In the last post, we talked in length about Parameters in PX4. This week we will learn about uORB, the hidden messenger of the PX4-Autopilot. It’s a weird name, right? Don’t worry, after reading this you will have a firm grasp on what uORB is about!
Why do we need uORB?
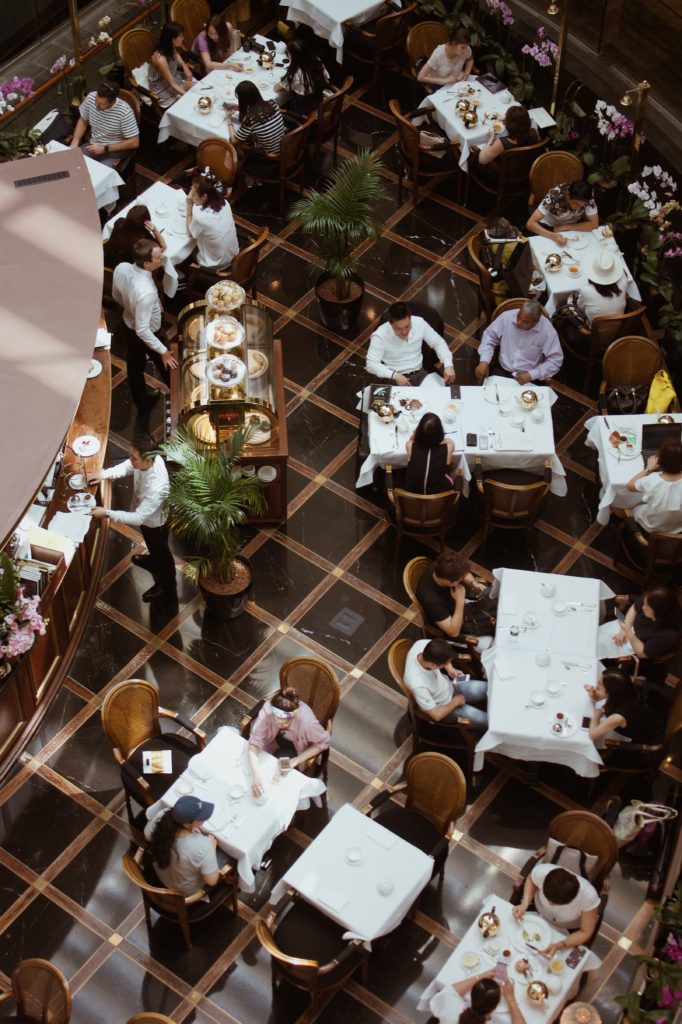
Let’s imagine a fancy restaurant on a busy Friday night. There are many guests ordering food, waiters are delivering food and taking orders. The kitchen is also going full steam, as the head chef shouts for an extra salmon. It is a chaotic scene, but the night is going on smoothly. Why? Because everyone is communicating.
When a customer needs something they call the waiter for help. When a chef needs a salmon, the inventory manager takes notice and runs down to fetch the fresh salmon from the inventory. All of this happens automatically and in an orderly fashion. Each person has their own priority as to which orders they should process first and does so systematically.
PX4 is very similar to the busy restaurant example above. It has over a hundred different modules performing their own tasks and communicating effectively with each other. The most important part is that it works flawlessly. Why? Because of the uORB messenger.
The image below represents all of the PX4 components communicating through uORB.
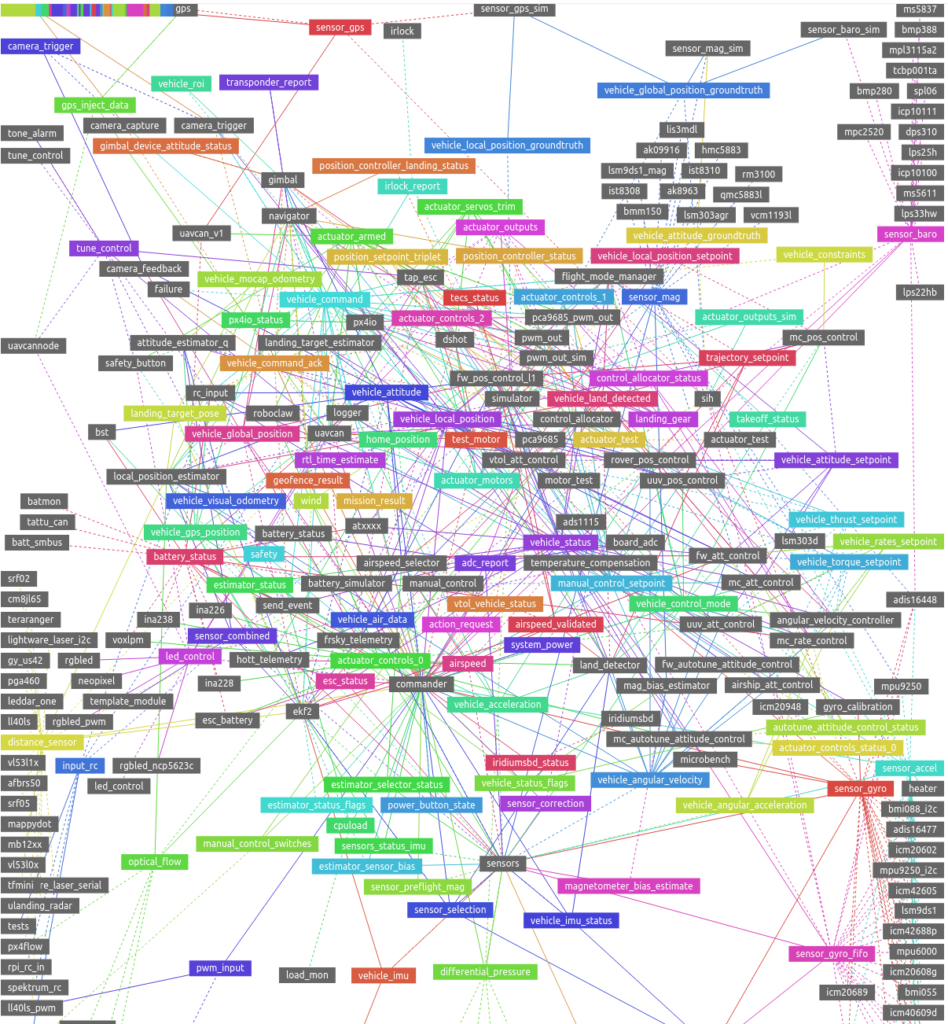
This is not a drawing by Picasso, but it is the whole current uORB messaging topology of PX4 in a single view. You can play with these interactive graphs if you visit the uORB graph page in the user documentation:
https://docs.px4.io/master/en/middleware/uorb_graph.html
The colorful boxes show the uORB message (Topic) names, and the gray boxes are the modules in PX4. The connections show the modules that use particular messages. It’s both beautiful and impressive since it shows the complexity of the PX4 Codebase.
uORB Terminology
First, let’s start with an overview of the terminology used to work with uORB in PX4. Here I drew a simple diagram showing 4 essential concepts of the uORB messaging system. It’s based on the Restaurant example above to help your understanding.
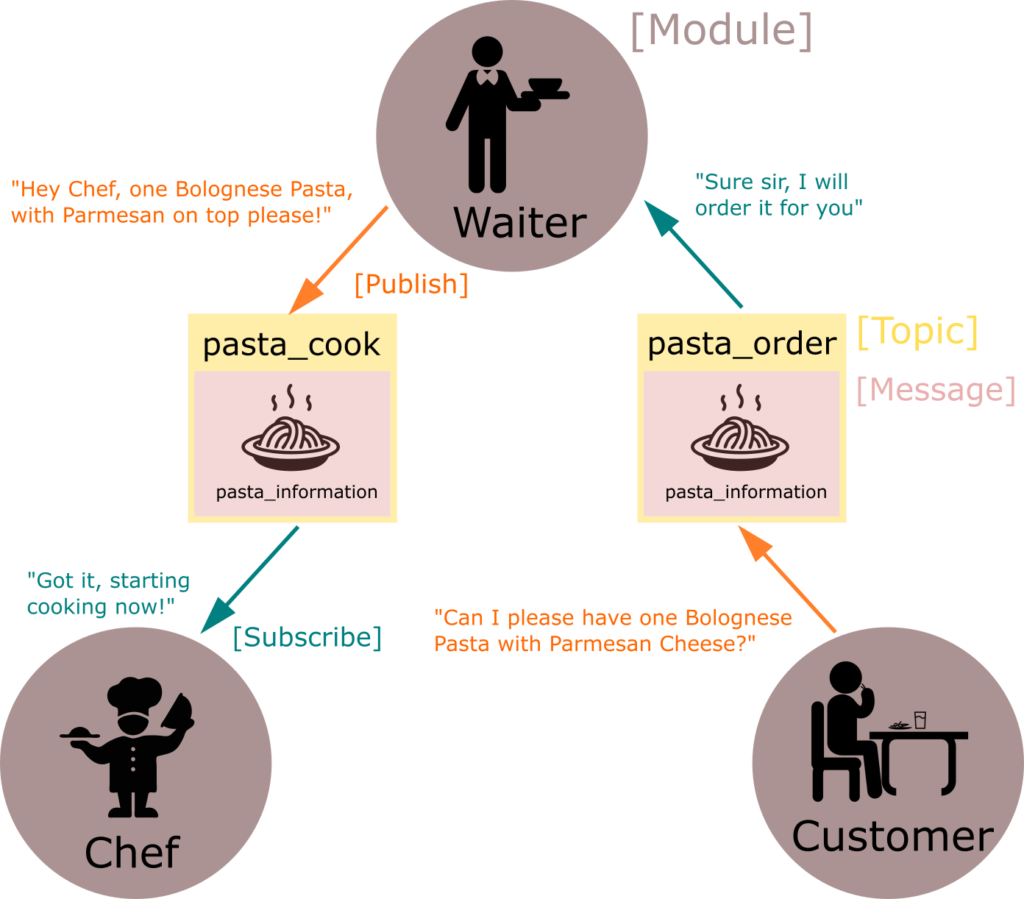
- Message defines the basic information format with a name and internal values, like a language grammar. A message describing Pasta could be named pasta_information, and store information such as menu name, cooked texture, temperature, and pasta type.
- Topic is a communication funnel where the message gets sent and received. A pasta order from the customer will go through the pasta_order topic and get delivered to the waiter. Then the waiter could relay that information to the chef through the pasta_cook topic. They both use the pasta_information message format, but when the restaurant is too busy, the waiter would wait a bit before sending the message on the pasta_cook topic. So different topics are separated from each other.
- Module are the chefs and waiters. They each have a specific role like cooking, taking orders, serving, etc. And they use uORB topics to talk to each other!
- Publish / Subscribe : Sending out messages on a topic is called publishing, and listening to a topic is called subscribing. Every topic therefore has at least one publisher and subscriber.
Hope you got the 4 main concepts of uORB by now. Let’s now actually implement this restaurant example in the PX4 Codebase level!
uORB Message
How are uORB messages and topics defined and what’s inside them? Let’s define the pasta_information message in PX4’s repository at msg/pasta_information.msg. The .msg ending means it’s a message file!
uint64 timestamp          # time since system start (microseconds)

uint16 customer_table_id  # customer’s table ID to know where to serve

uint8 menu_name           # menu, e.g. Carbonara, Amatriciana
uint8 cooked_texture      # how cooked the pasta should be, e.g. Al Dente
uint8 pasta_type          # type of pasta, e.g. Spaghetti, Lasagna, Rigatoni
float32 pasta_temperature # temperature of the pasta in degrees Celsius
msg/pasta_information.msg
This message includes all the information about the pasta one could ever ask for.
There is one field that’s mandatory for all messages: the timestamp. This tells when the message was published and is used by subscribers to determine the age of the message. It’s of course critical for pasta_information data since we don’t want to make the customers wait so much!
Other fields can be any type like uint32, float32, or uint8. In pasta_information the table ID is saved in 16-bit integer and not 8 bit since the restaurant has more than 255 tables and we need more range!
But that message file can’t be used directly in the code; these .msg files get analyzed and converted into a C/C++ struct (as shown below) during build time to make it possible for the codebase to use the message.
#ifdef __cplusplus
struct __EXPORT pasta_information_s {
#else
struct pasta_information_s {
#endif
       uint64_t timestamp;
       float pasta_temperature;
       uint16_t customer_table_id;
       uint8_t menu_name;
       uint8_t cooked_texture;
       uint8_t pasta_type;
       uint8_t _padding0[7]; // required for logger


#ifdef __cplusplus

#endif
};

/* register this as object request broker structure */
ORB_DECLARE(pasta_information);
This file would exist for example in build/px4_sitl_default/uORB/topics/pasta_information.h
That’s it about messages! We defined the message file and generated the C/C++ code compatible struct. Now it’s time to start using them in topics!
In Part 2 of the uORB Explained series, we will discuss how the .msg file gets seemingly magically converted into the struct!
If you are curious you can browse all of the messages in PX4 in the /msg directory: https://github.com/PX4/PX4-Autopilot/tree/master/msg
And there is a more user-friendly auto-generated user documentation showing all the messages as well: https://docs.px4.io/master/en/msg_docs/
uORB Topic
Now we have the pasta_information message defined. But how do we create a topic?
The build system by default automatically registers the topics with an identical name as the message, this way you can always use the topic name as the name of the message since it’s always registered.
But we want to have pasta_order and pasta_cook topics, neither of which are named pasta_information. How do we define these topics then? We define it by a comment at the end of the message file!
Let’s revisit the pasta_information message file:
uint64 timestamp          # time since system start (microseconds)

uint16 customer_table_id  # customer’s table ID to know where to serve

uint8 menu_name           # menu, e.g. Carbonara, Amatriciana
uint8 cooked_texture      # how cooked the pasta should be, e.g. Al Dente
uint8 pasta_type          # type of pasta, e.g. Spaghetti, Lasagna, Rigatoni
float32 pasta_temperature # temperature of the pasta in degrees Celsius

# TOPICS pasta_cook pasta_order
Do you notice the highlighted comment “TOPICS …” at the end? Here we define two custom topics that we need. The build system then registers them so that the modules can now use these topics!
uORB Modules
Let’s see how the topic names are used in modules with the example below. Don’t worry about defining a proper module class, that is covered in the section just after this!
// ------------------------------------------------------
// [Customer]
// Customer orders the pasta, which is publishing
uORB::Publication<pasta_information_s>  _pasta_order_pub{ORB_ID(pasta_order)};

// ------------------------------------------------------
// [Waiter]
// Waiter receives order from the Customer
uORB::Subscription<pasta_information_s>  _pasta_order_sub{ORB_ID(pasta_order)};
// Then sends out cooking order to the Chef
uORB::Publication<pasta_information_s>  _pasta_cook_pub{ORB_ID(pasta_cook)};

// ------------------------------------------------------
// [Chef]
// Chef subscribes to the cooking request topic
uORB::Subscription<pasta_information_s>  _pasta_cook_sub{ORB_ID(pasta_cook)};
You can see how different modules: customer, waiter, and chef publish/subscribe on different topics they are interested in. The Chef doesn’t care about the direct order request from the customer on pasta_order, so doesn’t subscribe to it. Same for the customer since you would never order to cook directly from the chef in a restaurant, so there’s no need to use the pasta_cook topic.
If you want to learn a bit more about adding a new message/topic, I recommend you check out the user guide which talks extensively about the process:
https://docs.px4.io/master/en/middleware/uorb.html#adding-a-new-topic.
Now you know how to define an uORB message and topic. The following section will cover how topics are actually published/subscribed with an example of the SafetyButton module from the PX4 source.
We will sadly need to say goodbye to our pasta analogy, but with this example, you will gain a more hands-on understanding of how uORB is used!
uORB Publication : SafetyButton
A SafetyButton is a module that reads in the signal from a safety button, which must be pressed before arming the drone. It is a safety feature of PX4 that prevents drones from spinning the motors themselves. We will go through the whole workflow of how this module publishes the safety message and it eventually leads to preventing motors from spinning, in the next section.
Let’s check how the SafetyButton header is defined:
#include <uORB/Publication.hpp>
#include <uORB/topics/safety.h>
The file starts by including uORB utilities (uORB/Publication.hpp) needed for publishing topics. It also includes the message struct of the safety message located under uORB/topics that the module will be using.
Let’s take a quick look at how the safety message is defined:
uint64 timestamp                # time since system start (microseconds)
bool safety_switch_available            # Set to true if a safety switch is connected
bool safety_off                 # Set to true if safety is off
https://github.com/PX4/PX4-Autopilot/blob/f0be554857342ffbaa381155e8b8af6394997050/msg/safety.msg
OK, pretty simple compared to the pasta_information example! It has the mandatory timestamp and two other pieces of information. We are going to focus on safety_off value for now.
class SafetyButton : public ModuleBase<SafetyButton>, public px4::ScheduledWorkItem
{
private:
       void Run() override;
// ..
       uORB::Publication<safety_s>     _to_safety{ORB_ID(safety)};
       safety_s _safety{}; // This is the uORB ‘safety’ message definition struct
};
The SafetyButton module registers the uORB::Publication utility that will publish messages on the safety topic. Remember? This is what the customer module was doing for ordering pasta!
The message type safety_s is generated from the safety.msg file during build time, just like pasta_information. . Using that, _safety object is declared for keeping track of the data internally as well.
Now with the _to_safety publication object, SafetyButton can publish safety messages! Let’s imagine a scenario where you press the safety button, what happens then?
Void SafetyButton::Run()
{
       // ...
       CheckButton(); // First, it checks if you pressed on the button

       if (!PX4_MFT_HW_SUPPORTED(PX4_MFT_PX4IO)) {
               FlashButton();

         // Second, safety_off gets set to ‘true’ if you pressed on it
               const bool safety_off = _safety_btn_off || _safety_disabled;

               if ((hrt_elapsed_time(&_safety.timestamp) >= 1_s)
                   || (_safety.safety_off != safety_off)) {
                       _safety.safety_switch_available = true;

                // Third, message struct’s member gets set to true to tell the button has been pressed, and safety guard is now off
                       _safety.safety_off = safety_off;
                       _safety.timestamp = hrt_bsolute_time();

                // Fourth, safety message gets published
                       _to_safety.publish(_safety);
               }
       }
}
I have already commented in the code above, but because you pressed the button, the _safety object will now include that information. Note that when you press the button, the safety guard turns off, which is why safety_off gets set to ‘true’. It then gets published through the publication object: _to_safety. Baam!, there goes our topic published into the wild uORB world.
uORB Subscription : Commander
Who is actually going to care about the fact that you pressed the safety button? In short: “Whoever is subscribed to listen to the topic”. In PX4 the commander module is in charge of this. It does so by subscribing to the topic, and we will examine exactly how that works below. Let’s check the src/modules/commander/Commander.hpp file to understand further.
// subscriptions
#include <uORB/Subscription.hpp>
// ...
#include <uORB/topics/power_button_state.h>
#include <uORB/topics/safety.h>
// ... and the list goes on
This part should be familiar to you by now, it includes the Subscription class and the header file of the topics it subscribes to. You may notice that it also subscribes to the power_button_state topic as well. In the class definition for Commander, we encounter the uORB::Subscription object for the safety topic:
// Subscription
uORB::Subscription _safety_sub {ORB_ID(safety)};
// Define safety struct object to copy the message data locally
safety_s               _safety{};
Very similar to how Publication is defined, right? However, since we are now subscribing, we always need to check if the topic has been updated (whether some module has published a new message on the topic). In the code, the subscription object is called by the updated() function to check if a new message is received:
// First, check if the safety topic has been updated
const bool safety_updated = _safety_sub.updated();

if (safety_updated) {
       const bool previous_safety_valid = (_safety.timestamp != 0);
       const bool previous_safety_off = _safety.safety_off;

     // Second, copy the received message data into the _safety object
       if (_safety_sub.copy(&_safety)) {
            // Third, enable the motor control (arming), since safety_off is ‘true’
               set_health_flags(subsystem_info_s::SUBSYSTEM_TYPE_MOTORCONTROL, _safety.safety_switch_available, _safety.safety_off,
                                       _safety.safety_switch_available, _status);
The fact that you have pressed the button is then copied to the local _safety message struct using the copy() function. And since safety_off is true, the motor control flag gets set. Which is basically the definition of enabling arming. Now you are allowed to arm the drone and take off!
Through this hands-on example of tracking how the uORB message is used from pressing a safety button to enabling arming, I hope you gained a more contextual understanding of how the uORB can be used. Feel free to browse around the codebase to search how other topics are being used!
Pro tip : If you want to search for uORB pub/sub object instances tied to a specific topic, use the “ORB_ID(<<topic-name>>” to search instead of “<<topic-name>>”. Since it will exclude all the other struct instances using the name in the code!
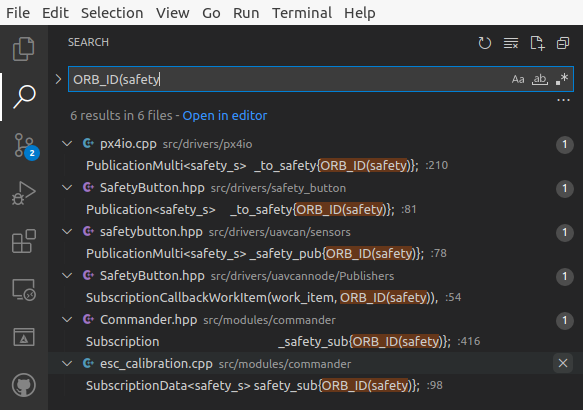
Here I searched for all the modules using the safety topic, you should definitely try searching for other uORB topics :D. I used Visual Studio Code on a local repository of PX4-Autopilot.
Another Pro Tip : If you press “.” (comma key) at the PX4-Autopilot Github Repo on the web browser, it turns into an interactive VS Code Editor. Where you can do : “Ctrl+Shift+F” to open the search tab and quickly search whatever you want!
Fun uORB related links to browse
Here are some links that you can visit to discover even more about the uORB system:
- Beautiful uORB Graph : https://docs.px4.io/master/en/middleware/uorb_graph.html
- uORB Concept : https://docs.px4.io/master/en/middleware/uorb.html
- All the uORB messages in the doc : http://docs.px4.io/master/en/msg_docs/
- Tutorial on another (C language interface) way of publish/subscribing to uORB topics : https://nxp.gitbook.io/hovergames/developerguide/px4-tutorial-example-code/hg-px4-example-lab-1
Thank you
I hope you enjoyed the uORB Explained: Part 1!
In Part 2, we will discuss the missing pieces of this post:
- How does the ‘.msg’ uORB Message file gets converted into C/C++ structs?
- How does the # comments in the message definition files turns into topics in uORB?
For more Tips & Tutorials
This post was part of the ongoing series explaining various confusing/complicated concepts in PX4. If you haven’t already, check out our previous blog posts!
Have any questions or feedback for the team?
Did this blog post explain the concept clearly? Did I miss anything important? Do you have suggestions on how to improve this blog post? Or have any suggested future topics?
If so, please give us your valuable feedback in the link below. I’m eager to read your feedback and thoughts on this blog post.
Meet you next time!
Junwoo
PS: You can find me on Dronecode Discord Server (click to get an invite)