Welcome to the final episode of the uORB Explained Series: Part 4!
In the past posts, we discussed the following:
- Part 1: Why we need uORB and its basic functionality
- Part 2: What uORB is really about, how uORB topics are instantiated, ORB Metadata
- Part 3: What happens “under the hood” when you publish/subscribe to the uORB Topic
In Part 4, we will discuss how the uORB topics are logged using the famous uLog Flight Logging System!
For this post, it helps to have the background knowledge on ORB metadata from Part2, which you can read beforehand by clicking here:
Also, we will be using the ‘pasta_information‘ uORB message example from Part 1 as well, so you may as well want to check that out:
ULog Flight Logging System
If you have been using PX4 for some time you are probably familiar with the concept of a ‘Flight Log’. This is a bit like the blackbox recorder for an airplane. PX4’s Flight Logging system, ULog, is integrated with uORB, allowing uORB topics to be directly logged. Other configuration data like parameters and system messages are logged via ULog as well.
The idea is to have an entire record of the flight including how the vehicle was configured, as well as the real time data that was exchanged between the modules during flight. This works because most of the data in PX4 runs through uORB giving us a near-complete view of system behavior, down to the microsecond level.
It’s an amazing concept that allows developers to easily figure out exactly what happened during the flight. ULog is the foundation behind the powerful flight analysis tools that are available to the PX4 Ecosystem.
Logger module
The Logger module takes care of creating ULogs. We won’t be discussing the exact usage of the logger in the post because it isn’t relevant for understanding how uORB is used and the logging format. You can find detailed documentation on the logger by clicking the button below.
That said, we will be reading quite a bit of the logger module’s code in this post!
What we will be covering
We will be learning more about:
- How to add a uORB topic to be logged
- ULog file format
- Where the uORB metadata gets used
- How the logger fetches the uORB topic’s data and writes in the log
Registering the uORB Topic to the logger
In order to save memory space and bandwidth, the Logger doesn’t automatically log every topic in the system. Therefore, if you have created a new uORB topic that you want to log, you first need to register the topic. This is done by adding it to the list of topics in the function `add_default_topics()`:
// This is where all the topics to be logged are added
void LoggedTopics::add_default_topics()
{
       // ...
       // Pasta cook request from waiter to the chef
       add_topic("pasta_cook");
       // Pasta order from customer to the waiter
       add_topic("pasta_order");
       // ...
}
Above we have registered the ‘pasta_cook’ and ‘pasta_order’ topics that we have been using throughout the uORB Explained Series. The individual call to the ‘add_topic()’ then adds the specified topic’s ORB_ID enum value to the list of topics to subscribe to.
Additionally, you can specify the logging interval as the second argument. As shown below, providing 200 (units are in milliseconds) will log the topic at a maximum 200 ms period, which equals a maximum 5 Hz logging rate.
add_topic("pasta_order", 200);
This is useful for limiting the bandwidth used for topics that are published at a high rate.
For example, if we had a topic that is published at 1000Hz, we probably wouldn’t want to log every single sample as it would use up a lot of the logging bandwidth and cause other topics to be dropped.
You can also call `add_optional_topic` which would only log the topic if it is actually getting published. This is useful for topics that are published only for certain cases.
add_optional_topic("internal_combustion_engine_status", 10);
For example, uORB topic on internal combustion engine status would never be published nor need to be logged when flying a quadcopter with an electric motor, so it makes sense to keep it as an optional topic.
Now the logger knows that we want to log those topics. Let’s now learn how the ULog is actually created.
ULog File Format
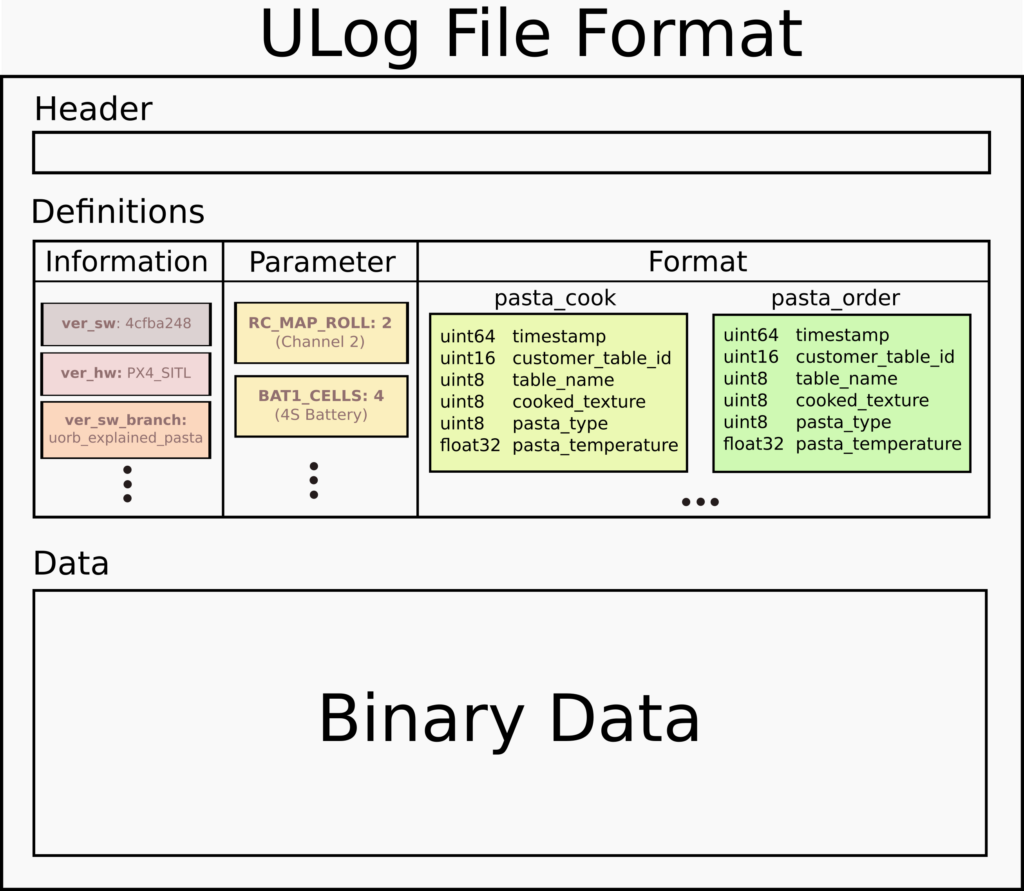
ULog breaks down into 3 parts:
- Header: Magic bytes to indicate that this file is a valid ULog
- Definitions: Software version, parameters, message formats
- Data: message data in a binary format, debug messages, parameter updates
You can find a full documentation on the ULog file format by clicking the button down below:
Header
ULog file starts with a custom string that indicates that the file is indeed a ULog. This part is called the ‘Header’ and is a very common concept among any digital file formats (JPG, PNG, BMP, etc.).
Definitions
The Definitions section includes a lot of information, including but not limited to:
1. Information (Version), which includes:
- Git commit that the software was build from
- Hardware Information (e.g. Pixhawk 5X)
- Vehicle airframe type (e.g. Holybro X500 v2 Quadcopter)
2. Parameters
3. uOrb topic Metadata
I have copied the start_log_file function that handles the Header and Definitions section here:
void Logger::start_log_file(LogType type)
{
       // ...
       _writer.start_log_file(type, file_name);
       _writer.select_write_backend(LogWriter::BackendFile);
       _writer.set_need_reliable_transfer(true);

       write_header(type); // Write the special characters required for uLog file
       write_version(type); // Write the software and hardware version information
       write_formats(type); // Write the format (inner fields) of uORB topics

       if (type == LogType::Full) {
               write_parameters(type);
               write_parameter_defaults(type);
               write_perf_data(true);
               write_console_output();
               write_excluded_optional_topics(type);
       }
       // ...
}
It first writes the header of the log file as defined in the ULog File Header Format with the `write_header` function.
Information Message
Then the version of the software and hardware gets written with the `write_version`. This step is where the software git hash gets included as well, which allows the developers to pinpoint the exact commit that the software was compiled from.
The screenshot below shows where the version information from the log shows up in the Flight Review. It’s extremely cool that you can just click on the commit hash and go to the commit that the software was built from!

You can visit this log and try it out yourself: https://logs.px4.io/plot_app?log=6623a683-2eaf-4683-bfca-edd244aa58e6
Parameters
Depending on the Logging Type, the logger module optionally adds the parameter information, which is an essential information for the log analysis, as it gives a snapshot view of the whole parameter system, which includes all the configuration/settings of a vehicle. If you are unfamiliar with the concept of a Parameter in PX4, you can read this blog post:
Format Message (Metadata)
Then we get to the “format” part of the log, where the uORB metadata gets recorded. This defines the structure of the data that is later logged in the data section and includes the topic names and the internal fields. It’s a crucial part since without this we wouldn’t know what all the logged data actually means! Imagine having tons of logged binary data (Data section) without any information on what each byte represents (is it a float? Integer? Is it an angle? A position? etc.)
The write_format function gets called for all the topics the logger subscribes to. Here I copied the Format message struct’s definition as well as the function.
// Definition of the Format information
struct ulog_message_format_s {
       uint16_t msg_size; //size of message - ULOG_MSG_HEADER_LEN
       uint8_t msg_type = static_cast<uint8_t>(ULogMessageType::FORMAT);

       char format[1500];
};

void Logger::write_format(LogType type, const orb_metadata &meta, WrittenFormats &written_formats, ulog_message_format_s &msg, int subscription_index, int level)
{
       // 1. Write the uORB topic name
       int format_len = snprintf(msg.format, sizeof(msg.format), "%s:", meta.o_name);

       // 2. Write the inner fields
       for (int format_idx = 0; meta.o_fields[format_idx] != 0;) {
               const char *end_field = strchr(meta.o_fields + format_idx, ';');
               // Convert the C type identifiers to actual strings like “int8_t”
               const char *c_type = orb_get_c_type(meta.o_fields[format_idx]);

               // Write the current field’s C type
               if (c_type) {
                       format_len += snprintf(msg.format + format_len, sizeof(msg.format) - format_len, "%s", c_type);
                       ++format_idx;
               }
               int len = end_field - (meta.o_fields + format_idx) + 1;

               // Write the current field name
               memcpy(msg.format + format_len, meta.o_fields + format_idx, len);
               format_len += len;
               format_idx += len;
       }
       // ...
}
Here you will find that the internal fields (o_fields) of the uORB topic get written to ULog. Remember the uORB topic metadata struct was registered from Part 2 for the pasta_cook topic?
const struct orb_metadata __orb_pasta_cook = {
    // o_fields string
    "\x89 timestamp;\x8a pasta_temperature;\x87 customer_table_id;\x86 menu_name;\x86 cooked_texture;\x86 pasta_type;\x86[7] _padding0;"
    // ...
};
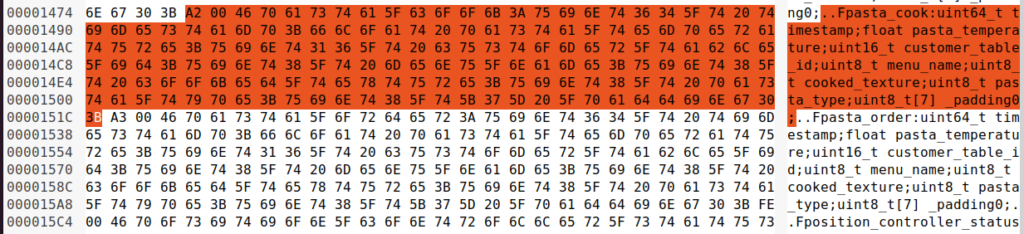
The o_fields string shown above contains what each field stands for, and in the ULog it gets formatted like this:
��Fpasta_cook:uint64_t timestamp;float pasta_temperature;uint16_t customer_table_id;uint8_t menu_name;uint8_t cooked_texture;uint8_t pasta_type;uint8_t[7] _padding0;
I extracted this from the actual ULog from a SITL test that included the pasta_cook topic. With this data, the analysis tools like PlotJuggler or FlightReview can actually figure out what the written binary data is about!
Data Section
After initializing the ULog header and format part, we get onto writing the actual uORB topics! That’s done here in the run() function, part of which I copied down here:
/* if this topic has been updated, copy the new data into the message buffer
 * and write a message to the log
 */
const bool try_to_subscribe = (sub_idx == next_subscribe_topic_index);

if (copy_if_updated(sub_idx, _msg_buffer + sizeof(ulog_message_data_header_s), try_to_subscribe)) {
       // each message consists of a header followed by an orb data object
       const size_t msg_size = sizeof(ulog_message_data_header_s) + sub.get_topic()->o_size_no_padding;
       const uint16_t write_msg_size = static_cast<uint16_t>(msg_size - ULOG_MSG_HEADER_LEN);
       const uint16_t write_msg_id = sub.msg_id;

       // ...
       // Write the uORB topic data in a binary form to the Storage Device
       if (write_message(LogType::Full, _msg_buffer, msg_size)) {
The function checks if there’s newly published data and copies it directly into the buffer.
And not surprisingly, since all of this is just binary data, when you open the data section of the ULog file, it is unreadable:
Example Module
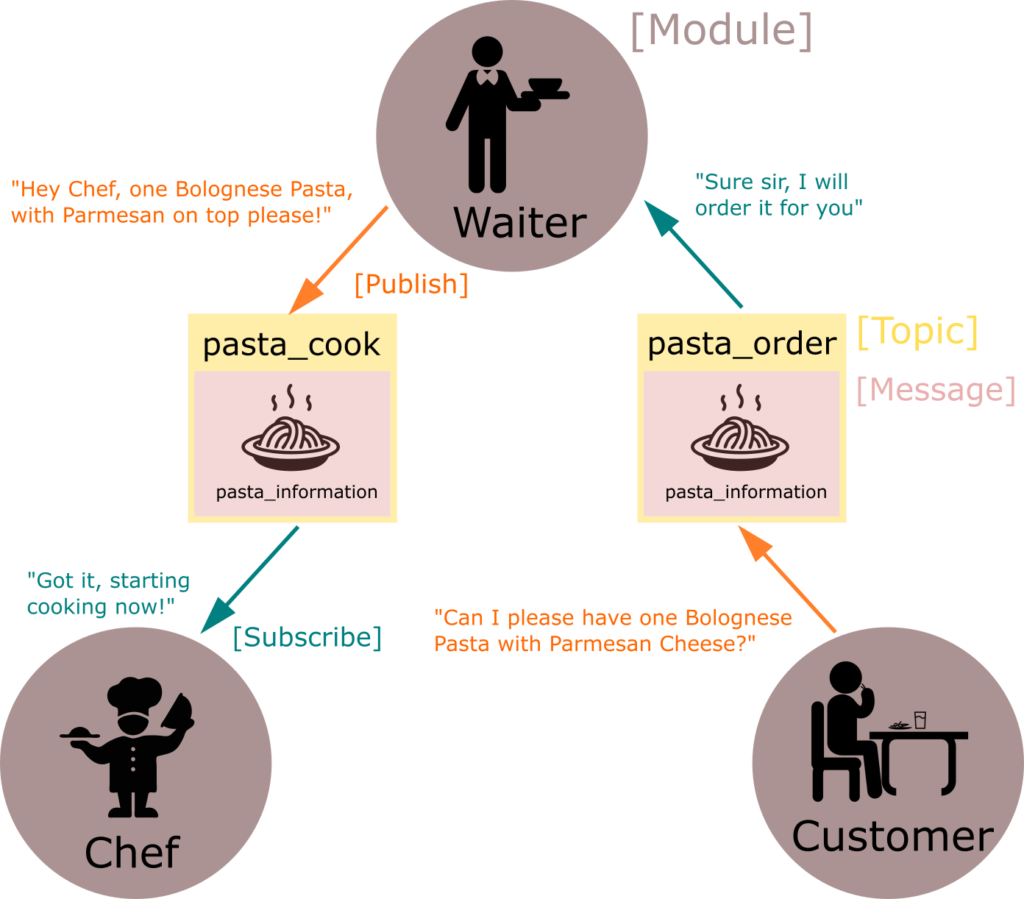
To finalize the uORB Explained Series, I wrote a module named “uORBExplained” that simulates exactly what the imaginary scenario of having a customer, waiter, and chef would do. Remember this diagram from Part 1?
I will explain what this module does briefly below and actually view the logged pasta_order and pasta_cook topics using a PlotJuggler in the last section!
Here is the commit that implements the uorb_explained module that publishes/subscribes the pasta_cook and pasta_order topics: https://github.com/PX4/PX4-Autopilot/commit/61476df6c337c24142313a589f441b7269a6df89
‘pasta_information' uORB message definition
As I was implementing the module, I realized that certain details, like enumeration values for different types of pasta menus, are missing in the message definition. So here is the final message definition that captures all the different possibilities of using the message.
uint64 timestamp                        # [us] time when the topic was published

uint16 customer_table_id                # customer’s table ID to know where to serve

uint8 menu_name                         # menu, e.g. Carbonara, Amatriciana

uint8 PASTA_MENU_UNDEFINED = 0          # Undefined: Default value if no value is set
uint8 PASTA_MENU_CARBONARA = 1          # Carbonara: With Egg, Pecorino and Guanciale!
uint8 PASTA_MENU_AMATRICIANA = 2        # Amatriciana: With Tomato, Pecorino and Guanciale!
uint8 PASTA_MENU_AGLIO_E_OLIO = 3       # Aglio E Olio: With Olive oil and Garlic!
uint8 PASTA_MENU_BOLOGNESE = 4          # Bolognese: With Beef and Tomato!

uint8 cooked_texture                    # how cooked the pasta should be, e.g. Al Dente

uint8 PASTA_COOKED_UNDEFINED = 0        # Undefined: Default value if no value is set
uint8 PASTA_COOKED_AL_DENTE = 1         # Al Dente: https://en.wikipedia.org/wiki/Al_dente
uint8 PASTA_COOKED_RAW = 2              # Barely cooked

uint8 pasta_type                        # type of pasta, e.g. Spaghetti, Lasagne, Rigatoni

uint8 PASTA_TYPE_UNDEFINED = 0          # Undefined: Default value if no value is set
uint8 PASTA_TYPE_SPAGHETTI = 1          # Spaghetti: Long, stringy pasta
uint8 PASTA_TYPE_RIGATONI = 2           # Rigatoni: Cylindrical pasta perfect for Carbonara!
uint8 PASTA_TYPE_LASAGNE = 3            # Lasagne: Flat, big pasta that gets layered on each other

float32 pasta_temperature               # [deg C] temperature of the pasta

# TOPICS pasta_cook pasta_order
https://github.com/PX4/PX4-Autopilot/blob/uorb_explained_pasta/msg/pasta_information.msg
In uORB message definitions, we often need abstractions like ‘menu_name’ shown above. Since we don’t want to send the full string “Carbonara,” which will require a lot of bandwidth and make things more complicated, we opt for having the enumeration variables defined in the message file like “PASTA_MENU_CARBONARA”.
This is readable to the developer, and it’s easier to handle than a full string. Of course, when you plot the data, it will only show up as the number ‘1’. This is something that can potentially be improved in the ULog viewer programs! (To show PASTA_MENU_CARBONARA instead of ‘1’)
Header
Here I copied part of the header where uORB publication/subscription objects are defined. You can see that we have a total of 4 communication channels, which correspond to the arrows connecting the customer/waiter/chef in the diagram above. We will be using them in the module to publish/subscribe to uORB data.
/**
* Publication for the 'pasta_order'
*
* CUSTOMER -> [pasta_cook] -> WAITER
*
* Imaginary topic where a 'customer' orders the 'waiter' to order a pasta.
*/
uORB::PublicationData<pasta_information_s> _pasta_order_pub{ORB_ID(pasta_order)};

/**
* Subscription for 'pasta_order', which is done by waiter to receive order from the customer
*/
uORB::Subscription _pasta_order_sub{ORB_ID(pasta_order)};

/**
* Publication for the 'pasta_cook'
*
* WAITER -> [pasta_cook] -> CHEF
*
* Imaginary topic where a 'waiter' orders the 'chef' to cook a certain pasta.
*/
uORB::Publication<pasta_information_s> _pasta_cook_pub{ORB_ID(pasta_cook)};

/**
* Subscription for 'pasta_cook', which is done by the chef to receive order from the waiter
*/
uORB::Subscription _pasta_cook_sub{ORB_ID(pasta_cook)};
Main Loop
Here I copied part of the main loop that is executed in the module. First, we have the customer logic:
hrt_abstime now = hrt_absolute_time();

// If a customer ordered a new pasta, publish (update) the new order
if (customer_order_pasta(now, _pasta_order_pub.get())) {
       _pasta_order_pub.update();
}
It then publishes on the ‘pasta_order’ topic if a new dish of pasta is requested.
Then we have waiter logic:
// Handle Waiter relaying the order from the customer to the chef
waiter_handle_orders(_pasta_order_sub, _pasta_cook_pub);
The waiter first checks if any new order was created via the subscription to `pasta_order`.
It then modifies/adjusts the order to include the customer’s table id and suggests pasta if the customer didn’t specify it in the order.
After that, the waiter publishes a new order for the chef on the ‘pasta_cook’ topic.
Finally, the chef checks if there has been any new data published on ‘pasta_cook’ by the waiter and prints out a simple message that indicates what kind of pasta (menu and pasta temperature) they are cooking.
// Handle Chef
chef_handle_orders(_pasta_cook_sub);
Please check out the full implementation of this example module to learn more about the details:
Running the Module
PX4 has powerful simulation tools, which are detailed in the user doc: https://docs.px4.io/master/en/simulation/
This allows developers to quickly try out PX4 code without needing real hardware. Instead, you can run PX4 on your local machine! This is the approach that we will use to test the uorb_explained module.
How to run the module
We will be using this branch that I created in the upstream PX4 Repository:
https://github.com/PX4/PX4-Autopilot/tree/uorb_explained_pasta
First, make sure you install the build environment by following the doc:
https://docs.px4.io/master/en/dev_setup/building_px4.html
Then, navigate to the PX4-Autopilot repository that you cloned, then do:
git fetch origin # Fetches the branches in upstream repository
git checkout uorb_explained_pasta # Switch to the example branch
git submodule update # Switch the submodules to the same commit as in example branch
make px4_sitl gazebo HEADLESS=1 # Build the PX4 SITL simulation
Result
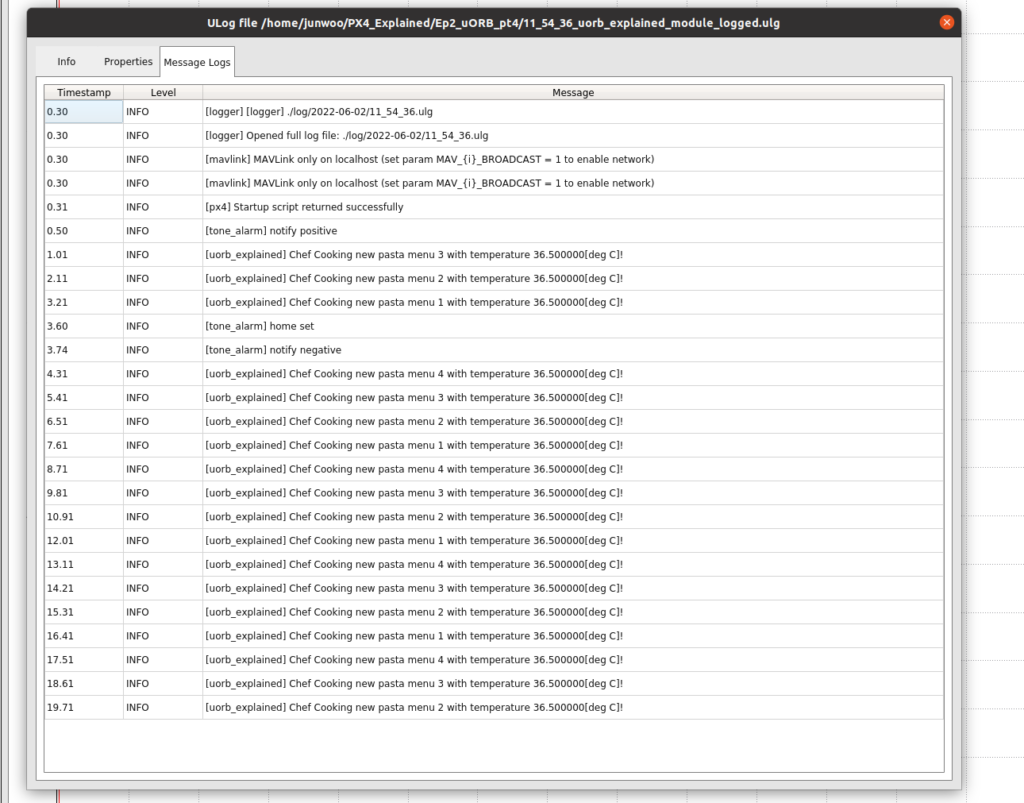
This will build PX4 and run it using the Gazebo simulator. You will then observe these print-outs on the console you launched the SITL from:
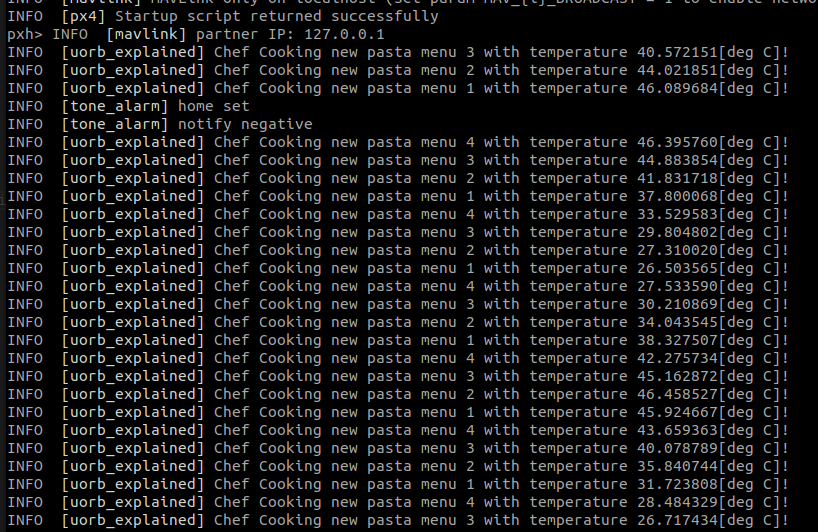
Notice how the Chef of our imaginary situation prints the message that indicates which pasta is being cooked right now. Remember that menus are enumerated values, so they show up as numbers. The requested pasta temperature draws a sine curve, which is implemented in the customer’s logic, to show something interesting when we plot the ULog.
Remember that this final pasta_cook information was delivered to the chef through the customer, waiter, and two uORB topics. It is quite remarkable how the uORB handles the data transmission so efficiently and does so without any error. This is why uORB is quite special.
Plotting the logged topics
Now it’s time for some fun stuff; let’s plot the data from both topics in the Plot Juggler!
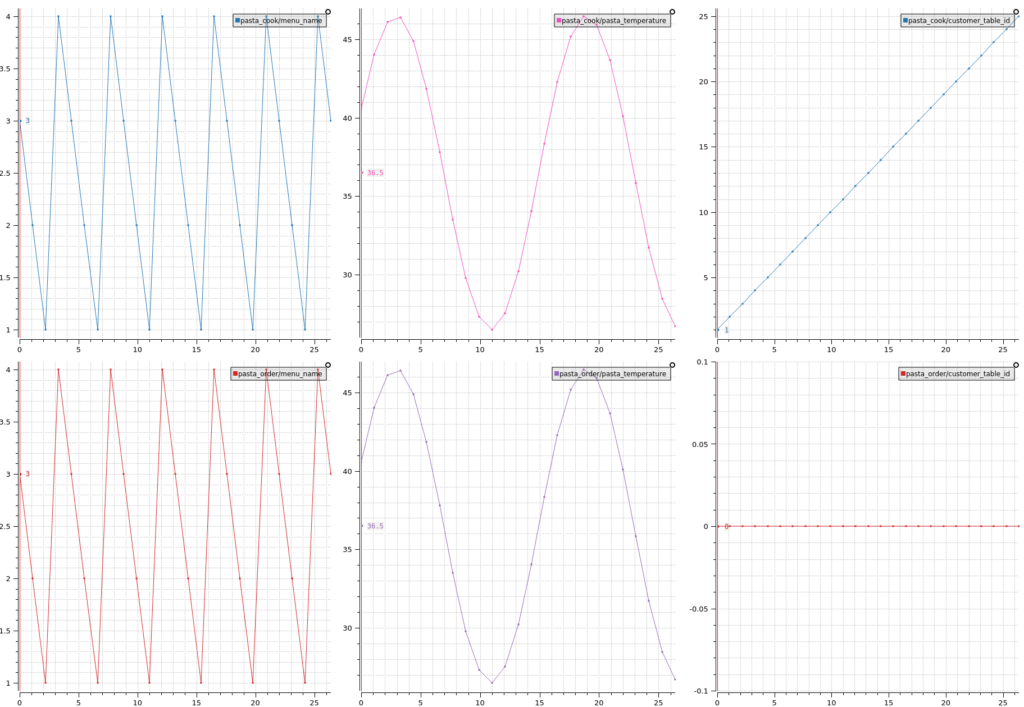
Here I am plotting each column starting from left to right: menu_name, pasta_temperature, and customer_table_id. Which are all the components inside the `pasta_infromation.msg` message.
The top row is pasta_cook, the message from the waiter to the cook, and the lower row is pasta_order, a message from the customer to the waiter. So you can imagine that the waiter modified the values and relayed the order (lower row) to the chef (top row)!
Note how the customer_table_id gets assigned in the top row on the right. It’s because the waiter filled out the field so that the dish would be delivered to the right customer.
Also, note how the pasta temperature requested by the customer (center-down) is drawing a sine curve, which is a fun feature I added to show the uORB message content intuitively.
Also, remember that this plotting with each individual field’s name labeled is possible because of the ‘format’ section of the ULog, which was generated from the uORB message definition file (pasta_information.msg).

I think it’s incredible how well thought-out the whole uORB message to ULog File to PlotJuggler workflow is. I really wanted to showcase how powerful the ULog is in this Part 4, and I hope you got inspired by understanding the process as well.
Flight Review for the Log
The ULog generated from the SITL test above is uploaded to Flight Review:
Feel free to browse & download the log and view it via PlotJuggler!
Thank You
Did this blog post explain the concept clearly? Did I miss anything important? Do you have suggestions on how to improve this blog post, or have any suggested future topics? If so, please give us your valuable feedback in the form below. I’m eager to read your feedback and thoughts on this blog post.
More information
- ‘uorb_explained_pasta’ branch of PX4-Autopilot used for this episode
- ULog File Format Documentation
- SITL Log of executing the test branch on Flight Review
Thank you for reading!
Junwoo
PS: You can find me on Dronecode Discord Server (click to get an invite)
Thank you so much for your kind and extremely useful blogs! I’m really expeting next series!
Hello,
I recently purchased a drone that uses Px4 and QGC.
I am getting flight logs which is great, but I am hoping to analyze it differently than just uploading it to the Flight Log Review program that is available.
Is there a tool or a way to convert the binary portions into a .txt file in an organized manner?
Thank you for responding if possible.